Friday, April 19, 2013

Art of Hearts

I did this couple of months back, but just posting now. Long time ago, I guess a year or more, I was looking for something on craigslist (which I am trying very hard to remember, but no luck) and found a listing, contacted the owner and went there, the item wasn't what I wanted or something, I seriously can't remember, but since I went there anyway, I browsed the other items they had for sale as the young couple were moving out of state (to HAWAII! this I remember). I picked up 2 long frames ($5 each) and some succulents ($10 I think).


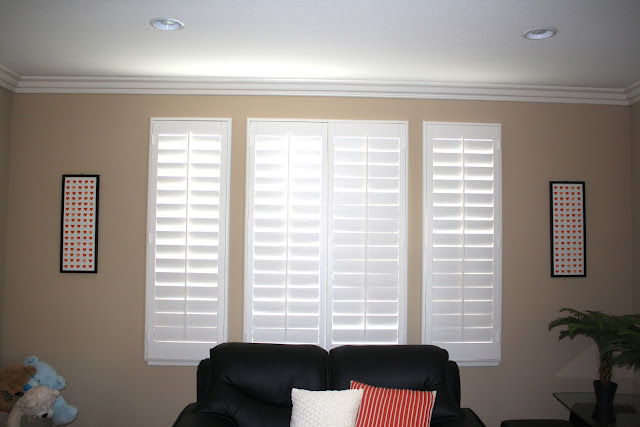
I have to say, I bought them just so I don't disappoint them, I didn't really like them. I had been planning to spray paint and put something in those frames for all this time and finally I did it. With inspiration from Megan @ Honey were Home, I cut out some hearts out of different shades of orange paint chips with crafts punch. You know Orange/Saffron is the main color punch in our living room (not as punchy yet, I am still working on it). It took a lot of cleanup and 4 rounds of spray painting (my first spray painting job, I hated the smell) to make them look acceptable. I cut a white poster and used it as background and attached the hearts on the glass using sticky foam pads instead of glueing them inside the frame. They gave a little dimension verses making it look like a print.


I just arranged different shades of hearts in random manner. An Ombre effect would have been good, but the shades I chose didn't create a great ombre, so I just threw them randomly.


It's not a statement piece, but they look good, have color, and size/shape of frames fit the place they need to stay at. So they are staying until I find/ make something better.

Afterall, I don't feel very bad about the deal. For $10 in frames and $3 in foam pads and poster I got a pretty good art.

The plants didn't go to waste either. I planted them in a turquoise planter from Home Goods ($15) and it sits next to front door.


Since they are drought resistant, I don't have to worry about watering them regularly. I am terrible with that. I let so many plants die in planters while trying to pretty up the front of the house. Seriously! sprinklers are invented for people like me!


I need to change that doormat ha!

Sharing this post at

Wow Us Wednesdays #114 @ Savvy Southern Style


Tuesday's Treasures #130 @ My Uncommon Slice of Suburbia
{wow me} wednesday! #99 @ Ginger Snap Crafts
Stop Look and Link party at In Designer Jeans

Weekend Wrapup Party @ Tater Tots and Jello

Wednesday, March 27, 2013

Art in Laundry Room

Our laundry room is a tight walk way to garage. So there had never been much happening in here decor-wise. The door to this room always stays open so I wanted to put some inexpensive art to liven up the space. I have been dying to use one of these free printables from Eighteen25. My latest design obsession is subway art, quotations and chevron.
I tried to print them as 5X7 photos at CVS but the colors were totally different than what you see on computer. I put it in an ikea frame anyway and lived with it for a month or so, but not happy at all. Then I came across MPIX. Just to try out, I ordered some prints of our daughter and one of these printables too and BOY! do I see a difference in proffesional printing! Awesome colors. Perfect pictures. Over the top packaging (seriously, they packed each size photos in a sepetate clear bag and mailed them in a high quality mailer envelop). I am hooked and never going to print at drugstores again. They are a little bit pricier than drug stores and we have to pay shipping, but so worth it. This is how it looks.


I loved this print in the laundry room so much but the other side of the door needed something nice too. On etsy.com, I came across a state map art with a little heart for the city we live in. I played around and tried to recreate it, including my favorite chevron print background. My absolute favorite color right now is Aqua, so I am trying to pair aqua with a different color in each room so they all seem seperated, but cohesive, if it makes sense. In Laundry room Aqua was made friends with Coral. Now I LOVE what I see when I walk out of our bedroom area.


On the wall next to the washer, I did not plan anything in particular, because it is not a visible space. But I had this metal strip with magnets from ikea, that I bought (2 of them) on clearance may be for a buck or less a year or more ago. I thought  this forgotten item can use this space and function to hold my daughter's occasional artwork from daycare. I know it won't work in the years to come when the papers start coming in mounds each week, but we'll think about that then. The original white magnets look blah. In one of my recent trips to target I bought a nuch of clearance stationary stuff from Mara Mi line. One of them were these pretty magnet squares (or rectangles) for couple of dollars. I used some here and the remaining are on the side of our fridge.


I tried so hard to get good pictures but the space is so tight and light is horrible, so you have to believe me when I say they look pretty.


Now, first time ever, with the little knowledge that I have in creating digital art, I am giving you this free printable of California state art. You can right click on the picture and save the image to your computer. Anyone living in southern california interested in it?


If you download this printable, I would appreciate if you can leave a comment with how you have used it and may be a link to your blog if you have one.


Linking up to
April Before and After Party! @ Thrifty Decor Chick
Weekend Wrapup Party @ Tater Tots and Jello
Wow Us Wednesdays #112 @ Savvy Southern Style
Your Whims Wednesday #105  @ My Girlish Whims
Tuesday's Treasures #128 @ My Uncommon Slice of Suburbia
{wow me} wednesday! #97 @ Ginger Snap Crafts

Tuesday, January 1, 2013

Wish you a Very Happy 2013


Hello everyone, Hope you all had a great Christmas with friends and family. WISH YOU ALL A WONDERFUL NEW YEAR and thank you guys for reading my occasional posts.


Tuesday, December 11, 2012

Christmas Tree 2012 - Kid friendly version

Here is out Christmas tree this year. Not as sparkly as last year, but beautiful enough to cheer the toddler in the house.


Some old, some new. Some hand made, some repurposed. Did you notice baby teethers, pieces of her mobile (she is too old for it now, so I cut it out and used the pieces on the tree), rattle toys and stuffed animals?


And the house all lit up, snowman standing by the door, the beautiful wreath on the door (I finally bought it after Christmas last year for $17.99 @ Michaels, 75% off its original price), nativity set under tree and some presents. I usually don't put out all presents until Christmas morning. People get too curious about them, you know, Hubs!!

And some closeup pics of all the ornaments...


 Here is the grand picture of the tree in all its glory.


That's our tree this year. I am linking this post at below link parties.


Holiday Home Link Party - Christmas Trees at Sarah's Thrifty Decor Chick.
Holiday_Home_2012_banner

House on the Way 

Learning 4 Keeps


I am waiting to see how everybody else decorated their Christmas Trees this year. Happy Holidays!

Monday, December 10, 2012

Pregnancy Journal - Gift Idea

When my lovely friend was pregnant, I was browsing online to buy her a perfect pregnancy journal. She is very special for me and nothing looked good enough to give her. I found some on Etsy, can't find the exact one I liked, but a bit in the lines of this and this. It felt a little pricey, but the reason I couldn't get it was because I couldn't get it shipped by the time I needed it. But looking at these, I felt like I could make one. I searched my stash of craft supplies and found this old scrapbook, in untouched condition. I happened to buy this scrapbook of sorts some time ago (read that as few years ago). I don't remember what I thought I would do with it when I bought it, but it was on sale ($3.99, still had the price tag). Probably that's what convinced me to buy it. So I bought some card stock and stickers at Michaels and got to work. I don't have a before picture, but this is what I ended up with.


I didn't want to dictate what the mom to be should write in each and every page, but wanted to suggest what I thought were good to journal about, so I wrote them on tiny Post-It notes and stuck them on each page.


This last page shows how the original pages looked. Spray-on adhesive saved a lot of time for me to attach the card stock. This book came with a pouch at the end the will allow her to keep some extra photos and ultrasound pics.

I was very pleased with it. It costed me close to $30 in total and about 5 hours of time, but well worth it. And the mom to be loved it.

Linking this post at Stop Look and Link party at Lauren's All Things Homie and at Tater Tots and Jello's Weekend Wrap up Party

PS: I was looking for the original inspiration for this journal on etsy to link it on this post and I stumbled on this. Same prego lady picture I used. Kinda neat to find coincidences.

Friday, December 7, 2012

Baby Food Station

I had baby bottles, food pouches, snacks, wipes etc. etc. etc. all over the counter. It felt insane to see all the stuff on the counter. The visual clutter bothered me, so I tackled it. This is how it looked to start with.


Now it looks like this. All the clutter went in to the drawer.


Well organized.


These are the items I need on daily basis. Extras are stored in the cupboard underneath. Though some of the stuff like baby cups and plates are stored along with our stuff, this daily grabbing station is working well. If only I can keep it this way all the time.

By the way, for those of you that wonder why I have baby food for 20 month old, this is my sneaky way to include veggies and fruits into her diet. I can't get her to eat as much fruits n veggies as I would like, but these food punches are sweet and she happens to eat them well at daycare (not at home though). So I send them to be used as snack or part of main meals. The non sweet baby food gets used in pasta sauces. Another sneaky way to feed healthy.

Thursday, December 6, 2012

TOT-Friendly Christmas Ornaments

With our 20 month old daughter around, it didn't feel safe to keep my beloved ornaments on the tree, within her reach. Though I did not use all our glass ornaments, I wanted to use some of the most cherished ones like Baby's First Christmas, Baby hand and foot prints, Apples and Pears etc.

I have to say, she had been way better with the whole tree thing than I thought. Not touching the Nativity set or pulling stuff off the tree. If she wanted to take off an ornament, she is very careful with them, looking at it makes me smile and kiss her. Even though she tries to be careful, I am still concerned that she might accidentally drop a glass ornament on the stone floor on one side of the tree and hurt herself. We bought a set of tiny soft toy ornaments at Costco and also used some of her baby toys, but they did not fill the tree enough. So I wanted to make some DIY ornaments that are Toddler-Friendly. Shatter-proof in particular. I have searched web for some easy ideas as I can hardly find time to do anything else but the usual chores (I guess time length between my posts shows that, I hope). With some inspiration in mind I went to Michaels and bought some wooden animals, glittery pipe cleaners and some wood sticks, for less than $8. I came up with below.


As you can see, these are very simple. I mean, so simple that I don't have to explain the steps. Wooden Animals with ribbon hot glued for hanging, pipe cleaners shaped as Christmas trees, kindaa... with ribbon loops, wooden sticks with adhesive backing ribbon attached in front and hot glued ribbon for hanging and some paper ornaments that I made with scrapbook paper on hand (inspiration from google images). That's it. 22 simple, tree filling, kid proof ornaments.


Now the tree is filled with shatterproof ornaments at the bottom and my beloved glass ornaments on top. I don't find it as beautiful as it was last year, but the kid is enjoying it. I am not stressing over the Christmas decor as I am back to work and schedule has been tight after becoming working mom. I am trying to fit my interests into it, but it's been hard, really really hard. I am amazed at all of you out there that do so much more along with taking care of family and work. Looking up to you ladies!


Linking this post @ Tater Tots and Jello & Hi Sugarplum and Stop Look and Link party at All Things Homie

Monday, November 19, 2012

My First Design Book - Purchased and Read

OK, the title may seem like I wrote a book, but actually I BOUGHT my first Design book and READ it too. You might be thinking WHAT'S THE BIG DEAL? But it is, for me, 2 BIG DEALS. First of all, I hardly buy books. I happened to buy few cookbooks, but not by famous authors. They are from clearance rack of Barnes and Nobles and 2nd hand book stores. I never really went to a book store or online looking to buy a book. But Young House Love is different.


I love their blog and following along their book progress. I have to be honest, I wasn't very impressed when I first saw the book cover, but I checked out some of the pages inside at Amazon and loved the ideas they put in and the way they were laid out. So I ordered it. Actually I added it to cart and waited, until I could find something else I need from Amazon to get free shipping on orders above $25. I found another book, cookbook to be specific, that's a different story on a different blog, and ordered it. Went on for a weekend trip to see a friend and they were home when I came back. So exited to see the book that it kind of felt weird to me that I am happy to see a book. I totally loved the book cover after physically seeing it and the hard cover makes it highend. Flipped through it and fell in LOVE with it. But I couldn't read it all that night. It went to my narrow-wobbly-IKEA bookshelf. All my books go there and never leave that shelf. Seriously. I haven't tried a single recipe out of the 20+ cookbooks and magazines I bought.

After a week, when the kid is in bed and hubby too as I completed my nightly chores, I felt like looking at the book's contents. No intension to read till the end, I started with page1. I'll be honest I didn't read everybit of it, like the intro and stuff. But the ideas were so brief, yet well described that I did not feel bored as I would reading any other book. So I completely read it. All 243 ideas. Till 1.50AM.

There, my 2 big deals. I went online looking for a book & bought it AND I read it all.

I LOVE LOVE LOVE my first Design book, I mean, YOUNG HOUSE LOVE's design book that I bought.

Friday, September 21, 2012

Duct Tape for Diabetes

I was catching up on my blog reads and my heart melted when I read this story and one of the comments on it at A Thoughtful Place. I have family members with diabetes and I have had a classmate with juvenille diabetes when I was in Elementary school, but I never realised how hard it is to care for a child with diabetes. I wouldn't have understood it as much before I had my baby, but now when I come across children with health problems I thank god many times for giving us a healthy child. Many of us new moms think taking care of a newborn/toddler is so hard (all those nighttime feedings, sleep cycles, toddler tantrums etc. that we complain about), though it is fun, but don't realise how lucky we are to have a healthy child. I bow in honor to the parents that do so much to provide a normal life for their children with extra needs. I was speechless when I read that Jack's friends, who are about his age, wanted to help and started Duct Tape for Diabetes to help find a cure for juvenile diabetes. They are selling little things like flowers, bracelets and coasters made out of duct tape and 100% of all proceeds will be donated to the Juvenile Diabetes Research Foundation. All products are made by these kids. I don't know how many people read my blog, but if even one person reads this and makes a donation, its worthwhile. If kids can do so much for such good cause, we can atleast spend a little money to make a difference right? Love you Sam, Chase and Grant, God Bless You and your friend.


You can read the full story at A Thoughtful Place.