Monday, October 28, 2013

Halloween week series - Day1 - The PUMPKIN

Happy Monday everyone. Since this is Halloween week, just for fun, I wanted to do a series of Halloween posts each day this week. Nothing SPOOKtacular, just some BOOtiful things we have been doing in preparation for Halloween. I think it will be awesome to do this every year, but lets see if I can handle it. We'll take it one year at a time. For this week, this is the plan.

Monday - The Pumpkins
Tuesday - Getting Crafty
Wednesday - The Costume
Thursday - Happy Halloween! Trick or Treat?
Friday - Highlights of the TERRORific day

For today, lets talk about the big old Pumpkin. The little one went to pumpkin patch with daddy last weekend and brought 2 big pumpkins. One that she decorated there and one plain sows can carve. Carving it is not easy, I found out last year. 1st time carving a pumpkin, just a basic Jack O' Lantern I tried with a kitchen knife. It came out ok, but I didn't research on treating it so it was moldy and nasty in couple of days.  So this year I went with the trusted painting route. I initially wanted to paint my daughter's hand prints, but it was more fun letting her paint the way she wants. She loved painting. So taped some painters tape on the pumpkin and cut out her initial. Then I gave her some paints (blue of course or she won't paint) and let her have a blast. 


Once the paint dried a bit, I peeled off the tape and we have this.


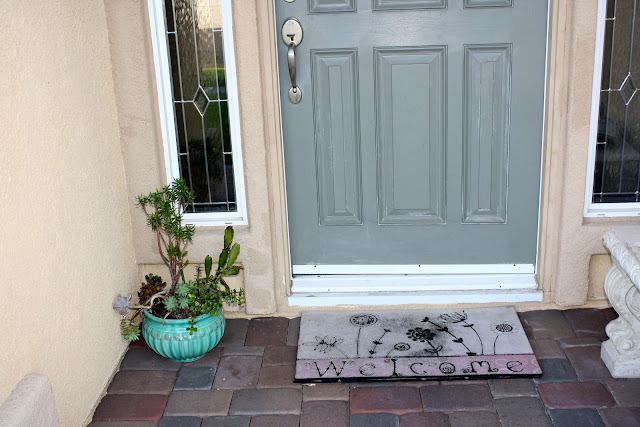
The small pumpkins I bought from grocery store. You don't really see all the colors I gave her, red white, metallic grey, black and blue, She just mixed up everything and made it a nice purplish grey, which matches with our front door though.

Speaking of matchy matchy, look at the other pumpkin she made at the patch.


Some more shots at the pumpkin patch this weekend. The girl loved it so much last week, she wanted to go again this weekend.


See you tomorrow with some crafts I want to do for school goody bags.

Kids Meal 2


School Lunch & Snack: Grilled cheese sandwich in butterfly shape (sneaked in some finely chopped spinach between cheese slices), boiled egg, cantaloupe, chocolate cream cookies (Bourbon cookies, indian brand)

Vitacost online store review

Has anyone been shopping at Vitacost?

I read about it in a magazine and coincidentally I saw it as seller on amazon for a high rated kids' juice box I was looking for (the brand is Froose, if you are interested). I visited their website and found a few other items (Justin's almond butter, tom's of maine children's tooth paste) that I had been planning to buy this week. Since I remembered from the magazine that this site offers $10 referral discount for both referee and referrer I googled and got one, but I had to spend $30 to get the $10 off, I added few more common staples like granola and organic lollipops and received the nice discount. I still had to pay 4.99 shipping but I still saved with that discount, plus the prices were much cheaper than the stores usually I shop. Justin's Almond butter would be $10.99 at our local Ralphs. Could have been higher at organic stores like Mother's Market. Vitacost has it for $8.75.


If you want a referral code for $10 off or $30, please click on the link here and click on unlock your offer button. Then register and you will have your code on screen as well as emailed to you. I will get a referral discount as well, if you register so thank you if you do.

Wednesday, October 2, 2013

Kids Meals - The Real World Problem for Moms - Kids Meal 1

I haven't posted any recipes or talked about food on this blog and I did not intend to when I started it. But as my daughter has grown from a baby to a preschooler, I needed help making dishes that are healthy and that she will actually eat. I realized normal family meals are not going to work. So naturally I reached out to internet for help. I found a bounty of inspiration and picked out some important elements to be a successful chef for my kid.

My key concepts:

1. Presentation Presentation Presentation! No matter how tasty the dish is, you can't manage to have your picky eater taste it unless it is visually appealing, atleast not mine. So I found the ultimate tool to prettify kids meals, THE COOKIE CUTTER. Yes, they make your life easy, not totally, but to a great deal. Collect some cookie cutters in basic shapes like circle, heart, star, flower and some in fun shapes like animals, butterfly, holiday, cartoon characters etc. They will be your new best friend. You can cut sandwiches, cheese slices, fruit, tortillas, deli meat, pancakes, waffles... the list goes on.

2. Sneak in the good stuff that your kid hates into the dishes that your kid loves. This is tricky because some food items have strong flavor. You have to do some trial and error, but there are ways to do it. For example, you can put cauliflower in mashed potatoes, spinach in smoothies and carrots in spaghetti  sauce.

3. Hang in there. Don't give up. Keep offering new food items/dishes to your child. It takes atleast 8-10 attempts to have the little ones take a bite of a new food. We don't stick around that long to make it work. For example, I offered my daughter Fried Calamari at Olive Garden 3 weeks ago. She straight away denied, even though she likes fried crispy stuff. So I didn't bother to offer tonight when we ordered the same, especially with the tired state of mind I was in. But when my husband did, she simply took it and ate, and asked for more. A reminder for me to keep trying.

Now I am attempting to regularly post some photos of her foods and possibly some recipes along the way so other moms can be inspired as well as suggest better ideas. I can't make every meal 100% natural and healthy, but my goal for each meal is to include whole grain, protein and fruit along with some sort of veggies sneaked in, plus a sweet treat that my kid likes.

Disclaimer: Foods pictured in boxes are what I pack for my almost 2.5 yr old for lunch and one snack while she is at school but she won't necessarily eat all of it. 50% leftovers is a good day for me. Days with barely any leftovers call for a celebration, though that's scarce. Foods pictured in plates are what I serve for breakfast/dinner at home. Please read descriptions below pictures for items that are missing in the picture, but are served as part of the meal.


Breakfast: Dollar size Sprinkles pancakes (recipe from here), banana slices in tulip and heart shapes, honey for dipping, 5 oz whole milk


School Lunch & Snack: Egg and Cheese Muffins, blueberries, cheese in flower shape, teddy grahams, homemade trial mix (cashews, yellow raisins, m&ms)


Light Dinner (when a lot of snacking happens in the evening): deep fried whole wheat tortillas (Puri in indian) again, cut in fun shapes (before frying), orange slices. 5 oz milk before bed (not pictured). Evening Snacks include String Cheese and chocolate filled cookies.

One other thing I would like to use around here is the ONE BITE RULE. Have one solid bite of everything that's served, even if she doesn't like it. We haven't been successful yet, but I got to get her to lick the food for taste. That's a good start right? I hope so.

Please feel free to leave a comment or send an email with your suggestions so I can better serve my kid.

Tuesday, August 13, 2013

My Blog post is featured on 'A Thoughtful Place' blog!

I am jumping with joy today, folks. I linked up my free printables at Courtney's "A Thoughtful Place" blog and she featured my post. Oh what joy! I love Courtney's blog. I am not saying this because she liked my printables. I really like her clean, easy, sophisticated, organized style. Apart from home decoration, I like her party styling and fashion posts. Her darling kids are so adorable. I read her every single post. You can imagine how excited I am when I started reading her post today as part of my daily reading and see my post featured. Never expected. Thank you so much to Courtney for encouraging a tiny blog like mine and thank you all that stopped by.

Wednesday, August 7, 2013

Plum Front Door

I am so so happy about this transformation with a little paint. Our front door was painted a boring pale grey green when we bought it. I don't have a picture that shows the whole door, but here is one to see its color.


I had been thinking of painting it a nice vibrant color for over a year. I had yellow, aqua/teal, saffron in mind. But I couldn't get hubby to agree on any of these colors. Though I wanted to go bold with it, something was pulling me back. I was afraid they may look too bright, like punching in your face bright. It will be our first attempt to paint front door so we brainstormed and decided on using colorful but subtle shade. So I brought some paint chips in muted shades of Teal, Red, Brown, Purple, Plum and Musturd yellow. I taped them to the door and looked at them from the walkway and them from the road. Plum was the winner. It went well with the exterior colors of the house and in future, if I can ever convice my husband to get the exterior painted in grey tone, it will look even better. So I went to Lowes and asked for a sample size since I only had to paint the outer side. Inside was white so I plan to paint it with fresh coat of white later some day. But the sample didn't get the right color, it looked more like chocolate brown than the plum/purple/brown mixed shade I wanted. The guy at the counter said it happens with samples that the colors won't come out right, so he suggested I try a quart. I didn't have a choice though I don't need the whole quart for this project (at $12). So I had him make a quart and the color came out perfect. It was paint and primer in one so I didn't have to worry about priming the door first.

Next, Washing the door. I started with wiping off with a wet rag, but boy, was that door dirty. I finally had to use a hose to spray water, scrub and wipe couple of times to make it better. I have to admit, I never washed that door in 3 years. May be once with just water. An my daughter touhces it everyday. Ewwww.... Now that I know, I will clean it more often.

I washed it in the morning and let it dry till evening. After work I started painting the first coat, took about 1.5 hours. Let it dry for couple of hours with door open, then shut the door for night. Long summer days really helped here. The color looked so good, it motivated Mr. to paint the 2nd coat next day. I had to do some touch ups after the 2nd coat dried to cover the unpainted nooks due to my so-not-precise taping.


I used an angled brush, but it had thicker bristles so it left streeks during first coat and showed the old color. It took a little work to get nice coverage. I think a better paint brush would have helped, but that's all we had on hand. For a bigger paint project, I will invest in a nicer brush.


But look at that beauty.


Now everytime we get in and out of the car, we adore that Once Boring, Now Rocking door. Next, we need to update those old handles and paint the trim white to make the door color really pop. For now, I am happy with this.

Wednesday, July 31, 2013

Organizing Kids Hair accessories

I love the cute kids hair accessories. I bought a few handfuls of them as soon as knew I was having a girl. I quickly realized many of them won't be useful during her 1st year. So I displayed them on one of the ribbons I saved from cute baby items packages. I just folded the ribbon in half, clipped all hair clips on it and hung it on a wall next to closet using a push pin. But as my collection grew, I had to unfold the ribbon.


Head bands were displayed on a bright pink magnetic flower I bought from Container Store while I was decorating the nursery, using little magnets that came with it.


Slowly that collection grew too and it ended up looking like this.

Couple of hooks from Michaels got the mess under control.


Now it looks like this.


Pretty organized ha... I found many wonderful ideas for hair accessories storage online. Few of my favorites.


I want to recreate this someday. If you have any unique ideas, please share.

Tuesday, July 30, 2013

Thermostat wall update

One of the most famous posts on this little blog is about framing our thermostat. But it was off center on the wall and I went back and forth on adding more frames to this narrow space. Finally I added couple more.


Colors in these pictures look darker than real life, sorry this is the darkest place in the house, no natural light at all. The top frame is from Ikea in metal finish. I added a patterned mat using some scrapbook paper and displayed the 3 hand painted strips I bought for a buck or two in Cancun on our vacation (best vacation EVER!). I saved them for 4 years for a perfect spot and finally it went on this wall.

The white frame is from Target. I loved the pattern on this. I framed the cake I made for my daughter on her 1st birthday. It has her name on it making it extra special.


These pictures really don't do justice, they look pretty good in real life. I am thinking on adding a vinyl text of some sort between the 2 new frames. Like this...


What do you guys think?

Friday, July 5, 2013

Weekly Meal Planning - Free Printable

Hope you all had a fabulous 4th of July. We had dinner in the backyard with friends and family. Kids fired some crackers too. As I promised, here is a free printable. A weekly menu planning printable for planning your meals Monday-Saturday. I skipped Sunday because everyone needs a break on Sunday, God took a break too. Hope you like it. Please let me know your valuable suggestions to improvise my printables so I can keep them in mind when I make more of these. Enjoy the rest of your weekend.

Wednesday, July 3, 2013

Greeting Cards Binder - Kids Birthday Cards

I have come across Greeting Card binders on internet and loved the idea of preserving precious greeting cards from special occasions. I have particularly seen many use this for cards received at their Wedding and for Christmas cards. We don't receive many Christmas cards and we didn't have many greeting cards for our wedding (we were married in a traditional way of our culture). But I did save my daughter's 1st birthday cards and we received many beautiful cards for her 2nd birthday recently. Though I can't save them from every year of her life, I thought keeping them as long as I can and as many as possible would be a good idea. I was planning on making my own but I stumbled upon shorter version of these binders at Target. They are perfect size for greeting cards and pretty too. But they were $5 each. I contemplated buying them for an hour while browsing the whole store and told myself, I might save a couple of dollars if I make my own, but I need to spend lot of time, plus it may not be as classy as this. So I brought the Orange one home. It looks classy yet whimsy with the gold dots.
I arranged the greeting cards by year and then by size, punched holes on them (lying, hubby did), put them in the rings and called it a night. Quick and easy. I plan on adding dividers, which I would like to personalize, along with the front of the binder. But it may be a while before I get to that. It still looks pretty as is.


This card was from 1st Birthday, I love how the Yellow/Lavender colors and the butterfly theme resembles her 1st Birthday party.


And this, from 2nd birthday, matches her Zoo themed 2nd birthday party. Love such coincidences.


My friend's 4 year old daughter made this cute card and sent all the way from Texas. Cards like this are the reason for this binder.


I like simple projects like this. They make me feel like I accomplished something, without having to put off the task for months or even years. My daughter liked it too, she flipped through it like a book, so its a win win.
I also found different binders at Micheals which could be a good fit for this type of project. They are from SN@P. But it rings pricier than Target ones even with a 40% off coupon ($14.99 originally). I did like the inserts for these binders that can be purchased seperately. I might try those for my dividers. Will keep you posted.

If any of you created greeting card binders to preserve your precious cards, please share the link in comments. I would like to know how I can improvise/personalize this.

Hope you guys are ready for extra long weekend. Sort of, even if you don't get to take off this friday. I am going to put together a quick and simple backyard party tomorrow. I will show you pictures if it turns out nice. If not, we'll just eat good food and enjoy good company.

Have a great 4th of July.


I will be back on Friday to share another free printable.