Friday, June 28, 2013

Weekly Planner - Free Printable

A free printable for folks like me that plan on Friday for the following week. Yup, My week doesn't start from Monday, it starts from Friday and ends on Thursday. Well, that's because I plan on Friday afternoon/evening for the weekend and the work week that follows. You might think why start with friday when I plan late in the day. Well, I complete some tasks on Friday evening like grocery shopping or atleast force myself to complete something around the house because I am usually a night owl on Fridays.

So here it is, for people like me. If you download please leave a comment (you don't have to mention your name, just be anonymous) so I know I have friends that think like me.

Again, it's still an image file, so right click on the image and open in new window or tab. Then right click on the image in new window/tab and save image to your computer. This way you will get a better quality file. I am yet to setup an online file share account so please bare with me.


HAVE A WONDERFUL WEEKEND.

Blog Header Redesign

When I first created this blog, I created a blog header using Picnik I think, I can't remember for sure. I found a collage template that I filled with some pictures and added my blog title text. Funny, I liked it then. I sized it to my initial blog template and it worked then. But as I gained more knowledge about blogging, my blog looked unattractive. Here is a picture of it.


What I don't like about it?
  • Blog name is not showing properly
  • Colors are dark
  • Pictures shown in there are old and don't really look esthetic.
  • Too tall and not wide enough
As I kept changing my blog template, I figured I liked the cleaner, modern look. So I tried changing the header, keeping in mind the things I wanted to change. Here it is now.


Its not the absolute best of what I wanted, but it looks a lot nicer. I will play with it some more but I think you'll see this for a while until my style changes and I feel like changing the whole look of this blog. I hope it makes you feel more invited to come back to my blog.

Next up, the menu bar below the header and then the social network icons. I better get on social networking before I make those icons. Working on it.

Have a great weekend everyone.


Thursday, June 27, 2013

Zoo Themed Party - 2nd Birthday

As promised yesterday, I am posting some pictures of our daughter's 2nd birthday. Since the kid was really into animals during her 2nd year, not too much into farm animals as much as wild ones so I decided it would be cool to go with ZOO theme and decorate with stuffed animals and hire a petting zoo. We all had a blast and I can't stop looking at the pictures and feel proud of myself. Here are some for you.


 And some shots of the big girl...


Hope you enjoyed it. Photography by Capture Reality Photography. I will try to write about the details in near future. You can view the 1st birthday pictures here.

Wednesday, June 26, 2013

Quick Washi Labels - Cereal Dispensers


I am obsessed with Washi tape recently so I grabbed a tin full of them from Micheals when they had them for 40% off. Though I like the bright designs, I mainly like the simple ones because I like them to use as labels. This idea to use them as labels is from Jen's blog, I Heart Organizing. After reading her posts, I first used them on my file folders, which I loved. Then came the Cereal Dispensers.


We are not cereal-every-morning people, but we eat them about 3 days a week. Each of us have different choices (I know, just in a family of 3) including my 2 year old, so for now we buy 4 different kinds.


I think you can tell which one is the kid's favorite. I sneak in a 3rd of Whole grain Cheerios (Honey or Plain) in that colorful junk (sorry Fruit Loops lovers!). Mine is the healthy kind and Hubby alternates between Honey Bunches or Cookie crisps.


I just pasted grey Chevron Washi Tape strips (CHEVRON MADNESS still) wrote the names with Red Sharpie. They kept coming off so I added clear tape on top. Now they are going nowhere.


The best part, virtually cost free labels that can be changed when the contents change or mood. I am going to be using these labels a lot more around the house and you will read about them, stay tuned.


Yellow & Lavender Party - Daughter's First Birthday

It has been 1 year 3 months that our daughter turned ONE and I haven't posted about her beautiful birthday party that I worked so hard for. I wanted to write a long post with every little detail so I have been putting it off. She has turned 2, three months ago and I haven't posted about either of the parties. So I thought its time to atleast post some pictures of the 1st birthday party. I am so proud of it because I worked day and night for more than a month to put this together, most of which is designed/made by me. Hope you enjoy the pictures as much as I do.


And the pretty girl ....


That's it, just pictures. Pictures by a local Photographer Kymberley Day. I will post the details soon, hopefully. Before that I will show you some pictures of the 2nd Birthday tomorrow.

Update: You can see 2nd Birthday pictures here.

Monday, April 29, 2013

Kids Rewards Chart - Free Printable

Happy Monday all. Last week I happened to make a rewards printable for my coworker for her son. Her son liked it very much and her daughter wanted one too, so I made a girly version of it. Here are the samples.


You can download the blank ones below and fill them up per your needs.


These are image files, you can right click on them and save to your drive. I am still trying to get an online account for sharing pdfs. Until I have that in place, please email me at LOVE2DECORATEBLOG@GMAIL.COM if you prefer a pdf. I will send it to you. No Charge! It's Free!

Hope you find them useful. Have a great week.

Friday, April 19, 2013

$1 update to Changing Table

We scored a used changing table on craigslist for $20 three of days after our baby was born. Thanks to my brother for picking it up. I was planning on using her dresser as changing table initially. When we came home with baby I realised we I need a place to change her diapers in our Master bedroom temporarily and tried to move her dresser to our room. It felt very inconvenient and that extra piece of furniture made the room tight. So I looked up on craigslist for a cheap changing table since I thought it will be a temporary fix for the diaper situation. I found one, it was so useful it stayed for over 2 years and we ended up changing diapers in our room all these years. I have plans to use is for storage once it out grows kiddie needs, but even for now, it is the best $20 I ever spent and I got a huge bang for my buck with it.

This was how it looked all these years.


The setup worked great, housing all diaper essentials, lotion, laundry bin, a space heating fan and occasionally my laptop. But after seeing it in same condition for 2 years, I was bored and ready to get it out of the room.

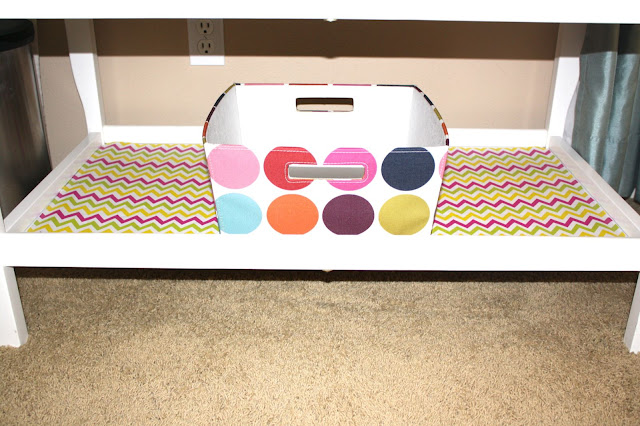
On my recent not-at-all-necessary trip to Target I bought couple of wired baskets and a roll of wrapping paper from the dollar section. I liked the chevron pattern (told you I am on the CHEVRON madness lately) and the colors in it. I didn't know what I would do with it but I bought it anyway. Next day when I was tidying up the room it sparked that I could line the changing table shelves with this wrapping paper to make it fun and colorful. So I did, then and there, stopping whatever I was doing.


You can't see it in the pictures, but I also lined the top shelf (under changing pad). The width was exact with the table shelves. I just cut the paper to length and placed it on the shelf, it stays put without glueing. The colors in it match perfectly with other items on the table, as well as the kid's crib bedding. By the way her crib is in our room as well. I also changed the old basket and used the one from our dresser.


Now I can have this pretty table in our room until she is completly off diapers (we are working on potty training, slowly, very slowly). 

Total cost: $1 for wrapping paper, and I still have half of it left over.

I will try to list the sources of many items in my pictures from now on and provide links as much as possible because when I read blogs and like to reproduce something I have hard time finding the items unless the bloggers mention where they got them from. I love those who provide sources. So here is my first attempt.

Sources:
Brown basket: Part of a pregnancy gift set from hubby
Laundry bin: Itso medium fabric bin from Target
Diaper Caddy: Babiesrus
Changing table: craigslist find (I have been very unsuccessful with finding stuff on craigslist in this town, but I did score big on few things like this changing table and portable crib).
Trash bin: Walmart (I don't miss expensive diaper pails at all. Just make sure this bin is emptied often i.e., every 2 days in initial months and every week now.)
Changing pad & cover: Babiesrus
Shelf Lining paper: Gift Wrapping paper from Target dollar section


Have a great weekend.

Art of Hearts

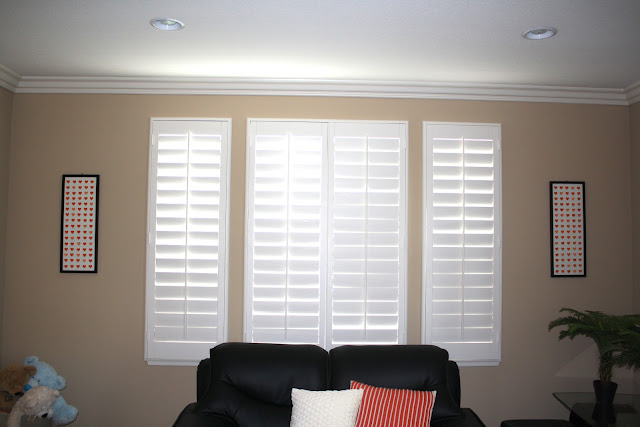
I did this couple of months back, but just posting now. Long time ago, I guess a year or more, I was looking for something on craigslist (which I am trying very hard to remember, but no luck) and found a listing, contacted the owner and went there, the item wasn't what I wanted or something, I seriously can't remember, but since I went there anyway, I browsed the other items they had for sale as the young couple were moving out of state (to HAWAII! this I remember). I picked up 2 long frames ($5 each) and some succulents ($10 I think).


I have to say, I bought them just so I don't disappoint them, I didn't really like them. I had been planning to spray paint and put something in those frames for all this time and finally I did it. With inspiration from Megan @ Honey were Home, I cut out some hearts out of different shades of orange paint chips with crafts punch. You know Orange/Saffron is the main color punch in our living room (not as punchy yet, I am still working on it). It took a lot of cleanup and 4 rounds of spray painting (my first spray painting job, I hated the smell) to make them look acceptable. I cut a white poster and used it as background and attached the hearts on the glass using sticky foam pads instead of glueing them inside the frame. They gave a little dimension verses making it look like a print.


I just arranged different shades of hearts in random manner. An Ombre effect would have been good, but the shades I chose didn't create a great ombre, so I just threw them randomly.


It's not a statement piece, but they look good, have color, and size/shape of frames fit the place they need to stay at. So they are staying until I find/ make something better.

Afterall, I don't feel very bad about the deal. For $10 in frames and $3 in foam pads and poster I got a pretty good art.

The plants didn't go to waste either. I planted them in a turquoise planter from Home Goods ($15) and it sits next to front door.


Since they are drought resistant, I don't have to worry about watering them regularly. I am terrible with that. I let so many plants die in planters while trying to pretty up the front of the house. Seriously! sprinklers are invented for people like me!


I need to change that doormat ha!

Sharing this post at

Wow Us Wednesdays #114 @ Savvy Southern Style


Tuesday's Treasures #130My Uncommon Slice of Suburbia
{wow me} wednesday! #99 @ Ginger Snap Crafts
Stop Look and Link party at In Designer Jeans

Weekend Wrapup Party @ Tater Tots and Jello

Wednesday, March 27, 2013

Art in Laundry Room

Our laundry room is a tight walk way to garage. So there had never been much happening in here decor-wise. The door to this room always stays open so I wanted to put some inexpensive art to liven up the space. I have been dying to use one of these free printables from Eighteen25. My latest design obsession is subway art, quotations and chevron.
I tried to print them as 5X7 photos at CVS but the colors were totally different than what you see on computer. I put it in an ikea frame anyway and lived with it for a month or so, but not happy at all. Then I came across MPIX. Just to try out, I ordered some prints of our daughter and one of these printables too and BOY! do I see a difference in proffesional printing! Awesome colors. Perfect pictures. Over the top packaging (seriously, they packed each size photos in a sepetate clear bag and mailed them in a high quality mailer envelop). I am hooked and never going to print at drugstores again. They are a little bit pricier than drug stores and we have to pay shipping, but so worth it. This is how it looks.


I loved this print in the laundry room so much but the other side of the door needed something nice too. On etsy.com, I came across a state map art with a little heart for the city we live in. I played around and tried to recreate it, including my favorite chevron print background. My absolute favorite color right now is Aqua, so I am trying to pair aqua with a different color in each room so they all seem seperated, but cohesive, if it makes sense. In Laundry room Aqua was made friends with Coral. Now I LOVE what I see when I walk out of our bedroom area.


On the wall next to the washer, I did not plan anything in particular, because it is not a visible space. But I had this metal strip with magnets from ikea, that I bought (2 of them) on clearance may be for a buck or less a year or more ago. I thought  this forgotten item can use this space and function to hold my daughter's occasional artwork from daycare. I know it won't work in the years to come when the papers start coming in mounds each week, but we'll think about that then. The original white magnets look blah. In one of my recent trips to target I bought a nuch of clearance stationary stuff from Mara Mi line. One of them were these pretty magnet squares (or rectangles) for couple of dollars. I used some here and the remaining are on the side of our fridge.


I tried so hard to get good pictures but the space is so tight and light is horrible, so you have to believe me when I say they look pretty.


Now, first time ever, with the little knowledge that I have in creating digital art, I am giving you this free printable of California state art. You can right click on the picture and save the image to your computer. Anyone living in southern california interested in it?


If you download this printable, I would appreciate if you can leave a comment with how you have used it and may be a link to your blog if you have one.


Linking up to
April Before and After Party! @ Thrifty Decor Chick
Weekend Wrapup Party @ Tater Tots and Jello
Wow Us Wednesdays #112 @ Savvy Southern Style
Your Whims Wednesday #105  @ My Girlish Whims
Tuesday's Treasures #128 @ My Uncommon Slice of Suburbia
{wow me} wednesday! #97 @ Ginger Snap Crafts

Tuesday, January 1, 2013

Wish you a Very Happy 2013


Hello everyone, Hope you all had a great Christmas with friends and family. WISH YOU ALL A WONDERFUL NEW YEAR and thank you guys for reading my occasional posts.