Thursday, December 12, 2013

Our 2013 Christmas Tree

Here is our Christmas Tree this year, not very different from last year.


I did not want to purchase any new ornaments this year. In fact, I donated some of our ornaments so the tree is less cluttered. I kept all the meaningful ones like the Lion & Lamb one that symbolizes peace, Chocolate and martini (mom & dad's favorites), the felt ornament H made all by herself with felt stickers, the one ornament I bought this year that says 2013 and the nicer ones like Santa, Starburst and the glitter one.


I also added some bangles that my daughter likes to wear to dress up alone with her hand and foot prints from 1st Christmas, a Baby Girl ornament and a personalized wooden ornament that has our names and year of marriage engraved, which was a present from hubby (a traditional gift for 5th anniversary).


For the skirt, I used the two Red and Silver tree skirts I had for a layered, fuller look. I skipped the nativity set this year, because all the pieces break easily and I can't trust H around it.


And for the topper, I used the birds and nests ornaments all grouped.


Here it is in all its glory.


And a shot with the biggest gift we got in life, sitting under the tree, in her school Christmas Program outfit.


Merry Christmas you all. Linking up to Holiday Cheer in Blogsphere @ Megan's and Courtney's.

Monday, December 9, 2013

Christmas Craft - Chalkboard Christmas Countdown

This year I wanted to make an advent calendar like this with little notes inside for different Christmas  activities but H is not old enough to read/understand and enjoy the activities. So I opted for a gift a day kind of advent thing. Still wanting to go with my inspiration (I had some colorful bags left over from her last birthday), I tried to find 25 tiny gifts but there were only few that can fit into those bags. After a lot of thinking, I came up with this idea of using Chalkboard art on a big poster that shows how many days left until Christmas and then a box or basket underneath/ in front of it to hold a gift each day till Christmas. With the help of these free printables as reference, I free handed the writing on both sides of a black foam board. I love using black foam board for chalk art (I used the same to draw a bunch of animals for H's 2nd birthday). They are cheap, can be cut easily to needed size and easy to draw on. One problem, you can't make mistakes, it's almost impossible to erase. Luckily I chose simple design so it wasn't a problem.

Front of the board says "Days until Christmas" and a reindeer with the numbers cut from scrap paper using my SLICE.


Back of the board says "HAVE YOURSELF a Merry little Christmas" (totally copied from the printable) which I can display on Christmas.


PS: I made the above 3 images high resolution so you can save or print if you like.


I love it so much. It makes me happy every time I see it. H is so happy to find her gifts everyday. I have been telling her about the elf (didn't introduce Elf on the shelf physically yet, may be next year) and how he watches and reports her behavior to Santa in Northpole, so she has been good these days.

Few more clicks of this.


Linking this post to Holiday Cheer in the Blogsphere @ Michaela & Cassie's blogs.

Saturday, December 7, 2013

DIY Pinterest Hover Button - Designing and adding a Pinterest Hover button to Blogger images - Tutorial

Most of the blogs have cute social media icons on the side bar or at the bottom of each post as well as Pinterest icon on each image in their blog posts. I am not much into social media but wanted to put the Pinterest icon on my images  for starters. I don't have much experience with web designing, so I tried searching for free Pinterest icon images but all I could find was the pinterest logo in different colors. I assumed most of the bloggers have their icons designed when they get blog designs done. Though I know some bloggers design their blogs themselves, no one provided (at least I couldn't find) any tutorial of sorts on how to DIY these icons. So I attempted to create my own. Not being a Photoshop pro, I had to turn to PicMonkey. After about 20 minutes of trial and error I realized it is easier than I thought to create my own social media icons. Here is what I came up with.


Now for new bloggers like me, here is the step by step tutorial.

Open PicMonkey and click on Design.


At this point you can resize the image or crop it in PicMonkey. Then save it to your computer. I saved it to computer as is and opened the image in Preview on my Mac then resized it.


Now that you have image ready, follow instructions from this link to upload your newly created Pinterest Icon into blogger and add it to your blog images.

That's it. Simple as that. So simple that you can change your icons as your blog design changes or just because.

Hope this tutorial will be useful.


For easy reference, I am copying the instructions from above referred link.

*********************************************************************************
BELOW INFORMATION IS COPIED FROM DIGITALK ONLINE BLOG just incase the link provided above did not work. I do not intend to repost it as my original content.
*********************************************************************************

NOTE: This requires editing your Blogger template. Before proceeding with the instructions below, I recommend that you backup your Blogger template first!
Don’t want to tackle these updates yourself?  I can help!
  1. In your Blogger Dashboard click on Template and then Edit HTML.
  2. Scroll down to the bottom of the code and find this line:   </body>
  3. Copy this code from BloggerSentral and paste it into your template code right above the</body> code.
  4. Click the “Save Template” button.
  5. Click the “Close” button.
Now view one of your blog posts and you should see a red Pin It button appear on top of your images when you put your mouse pointer over an image. You can call it quits now — or we can customize things a bit…

Use a Custom Pin It Image:

Download a Pinterest Icon to your computer or create your own. (You can get Free Pinterest Buttons for your Blog here!) Then upload your image to an external website such as Photobucket (and skip to step #5 below) – or you can upload it right to your Blogger blog:
  1. Create a new post.
  2. Add your Pinterest icon to the post.
  3. Once you see the image in your post, click the HTML button (top left corner). Now you will see the HTML code of the post. Look for the image code. It will start with <img and will include src= followed by a URL in quotes, similar to the yellow highlighted line shown in the image below. (Click the image to view a larger version of it.) Copy the URL that is in the quotes after src= (see the red underlined text in the image below); this is the URL of your image.
    Custom Image in Blogger
    Using a Custom Image for Your Pinterest Hover Image in Blogger
  4. Do not publish this post. The sole purpose of this new post is to store your image on Blogger. I recommend saving the post as a draft just in case you forget the URL. However, you can delete this post if you want to, since the image will still stay on Blogger’s web server.
  5. Now go back to your template’s HTML code (Template > Edit HTML) and find this code:
    var bs_pinButtonURL = "https://blogger.googleusercontent.com/img/b/R29vZ2xl/AVvXsEgzT9AxfXX2C5_oX9tp-m5MVG_N3ey6EJ7enBDo6SlyoTfy3tE8Sl56UcOangqNY7c8pRX0i9UgXH1sD65ove8MpvK-XaFk11O_gXSu7YOomMF4UwCk-FnIa58ldScs6Xn68M1aiTm-_2MT/s1600/pinterestx1_72.png"; 
    and replace the URL in the quotes (in red above) with the URL of your image.
  6. Click the “Save Template” button.
  7. Click the “Close” button.

 Change the Position of the Pin It Button:

By default the Pin In button will appear in the center of your image. If you prefer that it appears in the corner of your images instead, you can easily do that. Simply find this line of code in your template’s HTML code (Template > Edit HTML):
var bs_pinButtonPos = "center";
and replace “center” with one of these positions:
  • topleft
  • topright
  • bottomleft
  • bottomright
If you want to offset the Pinterest Button from the corner of your image so there is a little space between the button and the corner of the image, you can add some CSS code to the <head> section of your template (Template > Edit HTML):
.pinit-wrapper {margin:-10px;}
(The negative value for the margin pushes the button inwards.) For example, see the yellow highlighted code in the image below:
Adding Space Around Your Pinterest Hover Image in the Corner


Thursday, November 28, 2013

Happy Thanksgiving!

Hello everyone,

I guess everyone will be busy today preparing for hosting or being guests. I wanted to share our dinner table setting for this Thanksgiving. We got this new table from ZGallerie and I am head over heals happy about it, especially since we were able to get it at 60% reduction, including delivery. It has a tiny damage at the corner of one of its extensions, hence the discount, but I don't really mind it for that price. We still need to find chairs for it, but we are using the old chairs and a bench right now. Since we were able to get it delivered just in time for Thanksgiving, here is the first styling of this table for Thanksgiving dinner.


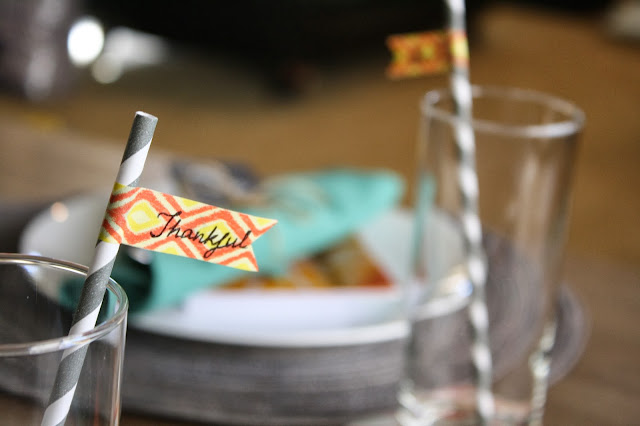
I used a cake stand as center piece to hold some fall decorations and a couple of mercury votive holders. Using my SLICE machine I cut some fall leaves using orange scrapbook paper and wrote some things we are thankful for this year. I rolled napkins and tied them with rope and added a black painted wood cutouts and wrote each person's name using chalk marker. Added washi tape flags to straws and wrote the words BE THANKFUL on each side of the flag.


Here is how it looked, loaded with food.


We are not into big turkeys so we just get a little chicken and keep the rest vegetarian.

Some of the items on the menu, clockwise - Roasted Cornish Hen, Mushroom Ravioli with Marsala cream sauce, Orange Koolaid with Pellegrino, Cheddar Bay biscuits, Stuffed mushrooms, Goat Cheese stuffed sweet peppers, Green salad with Strawberries, Candied walnuts & orange-balsamic glaze, Brazilian Flan.  We also had Green bean Casserole & Packaged organic Tomato Bisque soup that were not pictured. Linked the recipes I used.


I am definitely going to look forward for opportunities to set this table more often now. Happy Thanksgiving.

Sources of some of the items you see in this post:

Dining table - Archer Dining table from Z Gallerie ($560 including delivery)
Bench - from a flash sale on Joss & Main (around $250)
Chairs - from old dining table
Bar in the corner - Floor model from Crate & Barrel 4 years ago (around $200)
Glittered Pumpkin - ZGallerie clearance item (70% off of $19.99)
Mercury votives/vases - ZGallerie ($5 each)
Orange Fall leaf cutouts - Scrapbook paper cut using SLICE machine
Pine Cones - Thrift store ($0.25 each)
Square Cake stand - Homegoods ($14.99)
Napkins - World Market ($9.95)
Black Wood plates - Michaels ($0.35 each)
Straw Flags - made using Washi tape

Hope you all had a great Thanksgiving Feast. We sure did. After much needed rest, we shall start preparing for the best holiday of the year - Christmas!

Wednesday, November 27, 2013

Simple Thank You Gifts for Teachers

Of all the things we are Thankful for this year, having great teachers at my daughter's preschool is definitely in the top few. Though we have been fortunate to have good daycare experience mostly, we have had our share of stressful situations while finding interim care while our trusted caregiver was on long vacation. So we were very worried about how she would like the preschool and thankfully her teachers made the transition effortless for her as well as for us. I am still amazed everyday when I see how excited she is to go to school. So I wanted to send a small Thank You gift for her teachers. Here is what I put together.


A magnetic notepad with teacher's initial from Michaels, couple of mechanical pencils and a Thank You card from dollar section of Target and a small package of See's Candies. I wrote a personal Thank You letter in each card.


I also added leaf tags to the gift bags that I cut with my handy dandy SLICE machine. I got that machine for $20 on clearance at Michaels couple of years ago. They were getting rid of SLICE products so stocked up on as many design cards as I could find for $5 each and some other products to go with the machine. I use this machine from time to time for parties and gifts. I would love to get my hands on a Silhouette but I can't justify its price tag with my limited usage. So this works for now. I stamped it with a Thank You stamp that I found at Target dollar section.


No traditional Fall colors, just used the gift bags I had on hand and went with the colors in it to decorate the bag. 

I haven't seen many Teachers' gifts posts on blogland for Thanksgiving. Is it not usual? Maybe not, but we are grateful to them so I wanted to show my gratitude with these little gifts.

Thanksgiving is tomorrow. Is everybody prepping already? I am still planning the menu. We have a new table (sneak peak in the photos above, it's wood), so I am excited to set it for dinner tomorrow. I will try to post the pictures tomorrow.


Monday, November 18, 2013

Baby Shower Gift Idea - another Pregnancy Journal

Happy Monday! You may have seen the first Pregnancy Journal I made for a dear friend last year.


I loved it so much, I made another one few weeks ago as a baby shower gift. I wanted to give some unique gift that the mom-to-be doesn't end up returning/exchanging because she received too many of them. Seriously, how many onesies, baby blankets, baby toys does a mom-to-be receive at baby shower? I don't blame anyone, there is not much choice. Just a handful of stores and brands for baby items. So I decided to put my newly acquired sewing skills to use and made some burp cloths, which I will show you in a following post, a handmade pregnancy journal and just in time Sada from Casa de Lewis posted about Milestone cards, they were so cute I had to order a pack. I ordered from an online shop called Brimful. They were fast in shipping without charging a fortune.

Now what I used to make the Pregnancy Journal.

SN@P Binder from Michaels
Project Life Mini Kit - Baby Edition for Him
SN@P page inserts that go with SN@P binders
Baby Boy & Pregnancy themed Scrapbook stickers from Michaels and Jo Ann's
Assorted scrapbook paper from Michaels and Jo Ann's
Spray adhesive from Michaels

Here is how it turned out.


I made a little label of MOM's name using alphabet stamps.


This page for any note that mom wants to write. May be something like 'This is a journal of my journey towards parenthood'


 This page for When they found out, Whom they shared the news with first etc.


Some pictures of mom-to-be at the time and may be a picture of the happy couple.


Details during first trimester. I love the Project Life cards. They are standard size cards so you don't have to just use them in their huge Binders with inserts. They can be used for just about anything like love notes, lunch box notes, thank you cards, to send hand written messages to friends and family out of town, in any non-Project Life scrapbook…. endless possibilities. 


First ultrasound picture of the baby and a callout to write a fun message as if the baby was saying Hello.


2nd Trimester - Finding the gender of baby, cravings etc.


Names in consideration for the baby (another ProjectLife card). Mom-to-be's picture with due date.


3rd Trimester - What mommy is thinking, Baby shower details.


Another page for baby shower details, waiting for the baby.


Details of Labor and Birth, First picture of little bundle of joy.


Few inserts that came with the binder filled with Project Life cards (they are standard size cut outs so these cards fit in perfectly) for writing letter to baby, birth story, list of visitors, prices of common baby items/ groceries when baby is born (fun stuff to look at after few years) etc. They can replace these cards with some pictures/ birth portraits. I added some colorful washi tape strips just because.

That wraps the tour of this awesome pregnancy journal. Honestly, I am so happy every time I see the pictures of these pregnancy journals and get a little sad that I didn't make one for my daughter :( May be that is the reason I love to make these for friends so they don't miss it like me. I really wish to see one filled out. That will make it worth million times to see it actually used.

I hope I inspired some of you to make one for your future pregnancies or make them as gifts to your loved ones. Have a great week! Thanksgiving is just around the corner. I have to get teacher gifts ready and plan the big dinner.


Sharing this at The DIY'ers and Wow us Wednesdays @ Savvy Southern Style